Using the DLESE
NY Landscape Regions In Google Earth
The NY Landscape Regions collection of Google Earth tours was created and assembled by a group of NY State Earth Science educators during the spring and summer of 2006, supported by grants from the Digital Water Education Library (DWEL) and the Digital Library for Earth System Education (DLESE). The notes in this publication will help you get the most out of the tours included in the collection.
NY Landscape Regions in Google Earth home page:
http://www.stevekluge.com/geoscience/projects/dlesege/default.html
To report a problem or for more information contact: steve.kluge@gmail.com
Downloading and installing Google Earth
In order to view the NY Landscape Regions collection, you must have Google Earth installed on every computer that you plan to run the tours on. The software, including versions for both PC and Mac, is free and unobtrusive, and can be downloaded at earth.google.com. Those pages also list system requirements and have extensive faq and help pages, along with expanded “how to’s” and links to other Google Earth community pages. Spend some time exploring the site. An internet connection is also required for efficient use of the collection.
Getting Started
From the NY Landscape Regions home page, select a tour from a particular landscape region of the state. In this manual, we will use the file hhenv.kmz from the Hudson Highlands Landscape Region as an example.
Open the NY Landscape Regions page. Double click the Environment link under the Hudson Highlands section on that page. One of two things will happen:
· The file will automatically open in Google Earth (you may be prompted to approve that action…).
· The file will be downloaded to your hard drive, and will have to be opened with a double click from there.
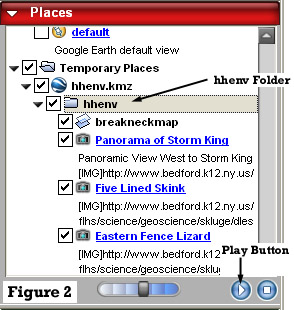
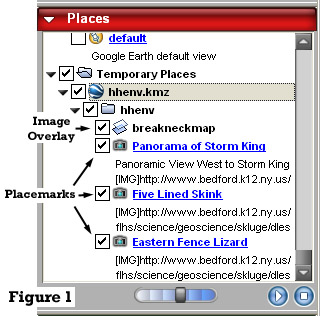
Take a look at the Temporary Places folder that is displayed in Google Earth (Figure 1). Notice that a file called hhenv.kmz is displayed, and within that file is a folder called hhenv.kmz. Within that folder are an image overlay called breakneckmap, and 3 placemarks (identified by a small camera, indicating that these placemarks contain photos) called, “Panorama of Storm King”, “Five Lined Skink” and “Eastern Fence Lizard”
Playing the Tour

Click on the hhenv.kmz folder to select it (it will be highlighted in gray), and make sure that the image overlay and placemark boxes below it are checked. (Figure 2)

Click the play button, and Google Earth will fly you through the image overlay and placemarks.
Monkeying Around With the Map

Click the image overlay breakneckmap to select it (it will be highlighted in gray) and make sure its box is checked. Use the image opacity control to vary the opacity of the map overlay. (Figure 3)

This feature is particularly useful while teaching topographic maps, or to reveal details in particularly low res coverage areas.
Viewing the Placemarks

Placemarks can be accessed by clicking on the placemark in the Temporary Places, or by clicking on the placemark icon directly on the image (Figure 4).
Clicking the placemark on the image opens a dialog box that will contain information, a picture, or a link to an external web page. In the example in Figure 4, a click on Five Lined Skink will open an image and provide a link to the photographer's email. Other placemarks may open a link or a document in a new browser window.
Options

You will probably want to make sure that web links in placemarks open in an external browser, rather than taking up space on the Google Earth display.
Select Tools, and then Options from the Google Earth toolbar. In the preferences tab, check “Show web results in external browser” (Figure 5). Now when you click a link in a placemark, a new browser for that link will be launched.
Other options you might want to adjust are in the view folder, especially vertical exaggeration. Use 3 where the local relief is small, 1 where the local relief is large.
Teaching Tips

Use your imagination!

These Google Earth Tours were created by a team of people, each imparting their own style to the tours they created. Some contain a lot of information, some contain questions to spur class discussion, and some actually link to related labs and worksheets. The thoughtful teacher will view the individual tours ahead of time and decide how to incorporate them into their lessons. Some tours may best be viewed on the projector in front of the entire class. Others are designed to be used by individual students, either at home or in the computer lab. Still others have worksheets and labs attached, and worksheets and labs can be written around any of them.

The first time your students use Google Earth in class, just plan on letting them play for a bit - give them some time to find their homes, to Ooh and Ahh, and learn to use the controls. If you try to launch them directly into a lesson, they'll play anyway, so just figure the play time is practice!

Created on ... July 16, 2006


FastCounter by bCentral